
But, one of the rules I made for myself is I'm not allowed to post a bunch of fluff just for the sake of getting to 100. There has to be a reason for the post. I thought I'd do a tutorial on joining on a new shuttle thread, because I know this is something new tatters have trouble with. There are several reasons why you might have to do this: the thread broke, you ran out of shuttle thread, you found a mistake and the easiest way to undo it was to cut the core thread and pull it out, or you want to change colors.
The first picture shows the cut shuttle thread. If at all possible, I like to join on my new thread before making a ring. Then I can tat one tail into the ring, and the other into the following chain. I think that tatting over two tails at once looks too bulky.
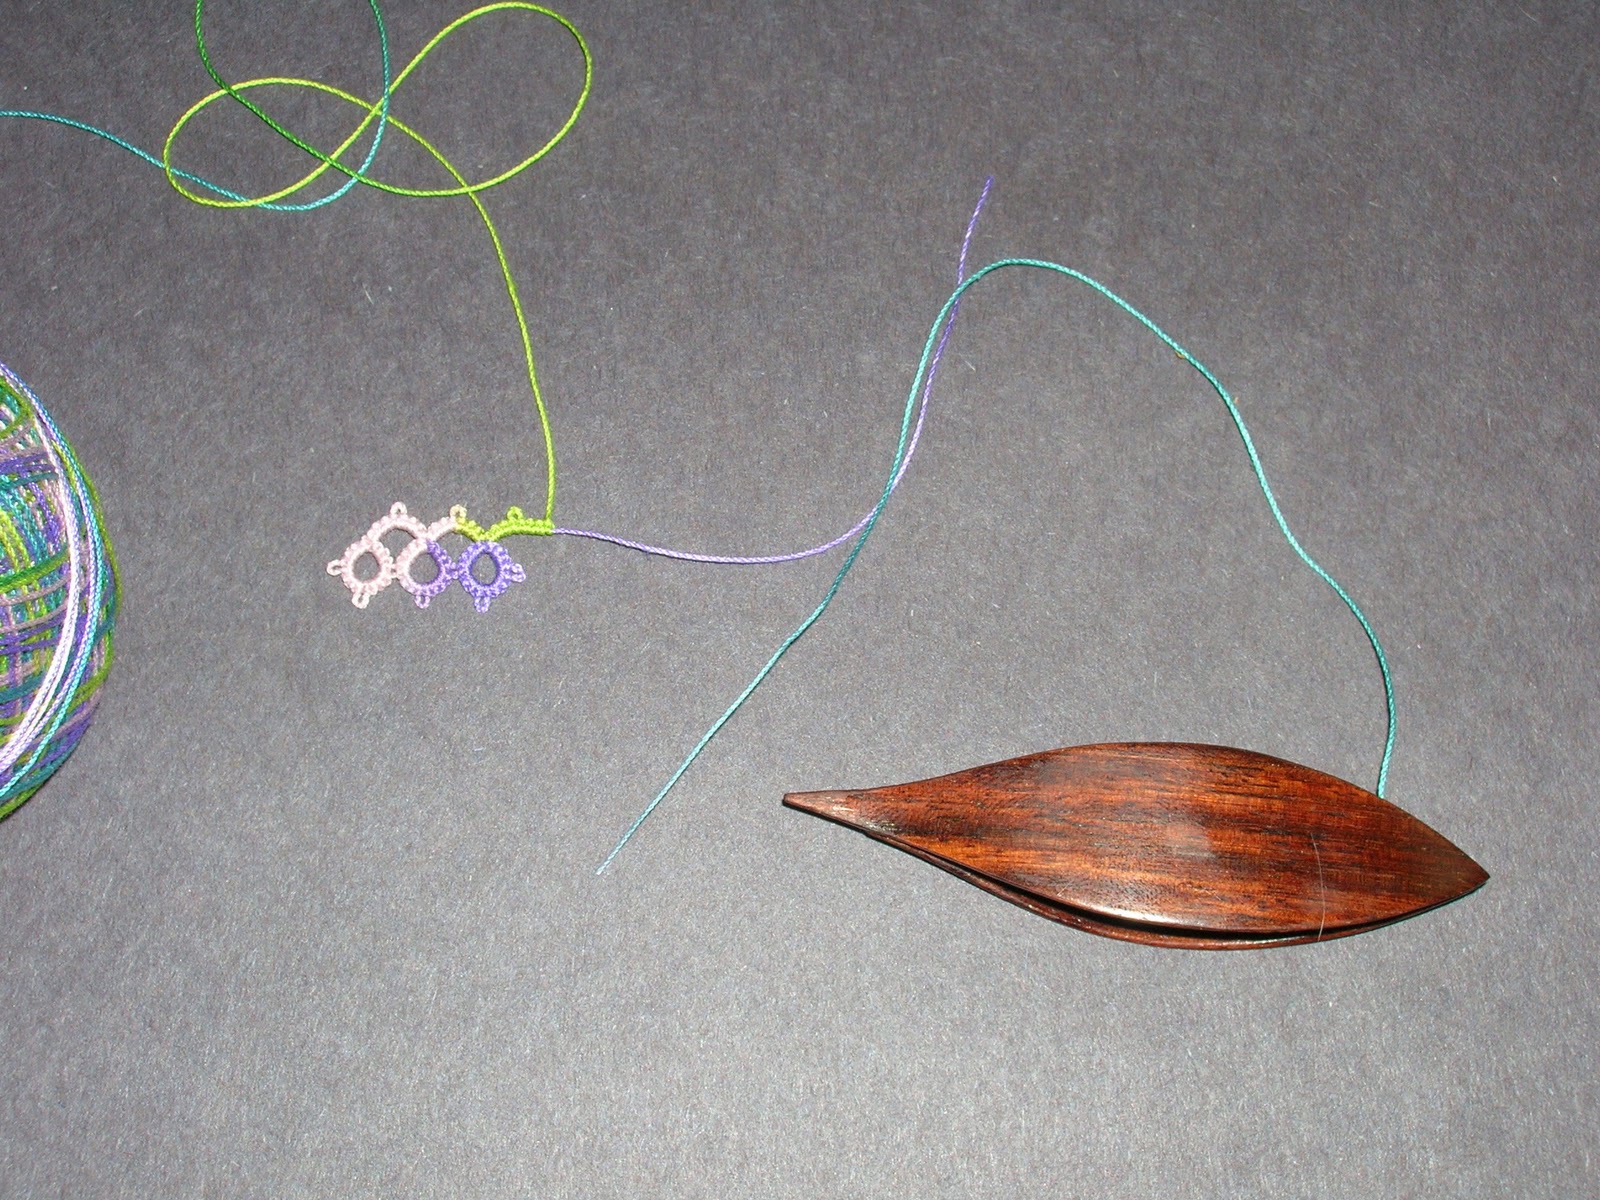
Tie a slipknot in the new shuttle thread, making sure that the thread leading to the shuttle is the end that will slip. This picture shows the knot loosely formed so that you can follow the thread.

Tighten the knot by pulling on the short end, but don't make it too tight.

Pass the old shuttle thread through the loop.

Slide the slipknot up the tail of old thread so that it is flush with the tatting. Tighten the loop by pulling on the shuttle.

Continue pulling on the shuttle until you feel a little "pop". When you feel this, you will have pulled the loop of the slipknot all the way through, and the old thread will now form a knot around the new one. This is a similar concept to flipping the stitch when you tat. You may need to practice this part a few times until you're comfortable with it. Click this photo if you need a larger view of what it should look like.

The knot is now secure and you can resume tatting. The threads will usually align themselves nicely so that one of them will "want" to go with the ring and the other will "want" to go with the chain. Here you see one tail being tatted into the ring.

And the other tail being tatted into the next chain. If you are unfamiliar with tatting over tails, please see Gina's excellent video demonstration.

Here is the completed chain.

And I have created a fabulously beautiful edging.

Not everyone does it the same. Some tatters prefer to simply lay the new thread parallel to the old and skip the knot because they don't like they way it looks. I can definitely understand this argument; however, I am paranoid, and without the knot I would be afraid that the tatting would pull apart in this spot if it got tugged on too hard. In fact, I've seen this happen.
One final perfectionist note. When using a variegated thread, I would normally try to align the color of the new thread to the old as closely as possible. I didn't do that here so that you could see where all the threads were.
Now for the fun! Since I'm celebrating two milestones, I decided to have two giveaways. I think most tatters will like them both.
Giveaway A:

This includes three snowflakes of my own design (for details on the snowflakes, see this post); a 10-yard sample of each of the hand-dyed threads used to make said snowflakes; Lacis crochet hooks in 0.4 mm and 0.5 mm; a Clover crochet hook in size 8 (not pictured due to a backorder issue, but it will definitely be here by the time the giveaway closes; Barbara Foster tells me that, although there is no industry standard for crochet hook numbers, Clover's size 8 is about 0.9 mm); Delica seed beads in three neutral colors that will look nice with any thread; and a pair of Gingher embroidery scissors.
Giveaway B:

Here's how it works:
1. To enter, leave a comment on this post by Thursday October 28.
2. A single comment qualifies you for both giveways, so only one entry per person.
3. The same person will not be allowed to win both giveaways.
4. Your comment must include a way for me to contact you. If your Google profile includes your e-mail address, or you have a blog that I can leave a comment on, that's fine. If not, you need to give me your e-mail address; you can disguise it from spammers in the form of "yourname at emailprovider dot com".
5. At 5:00 pm Mountain Daylight Time, Thursday October 28, I will use a random number generator to select the winners. I will then e-mail the two winners to get their mailing addresses, and announce their names.
All clear?
Thank you so much for this tutorial on how to add a thread. I've done other things but I like this because it's simple yet effective!
ReplyDeleteI would also like to be entered in your giveaway- thank you!
Congratulations on your 100th post!
ReplyDeleteThank you so much for the information on how to add a new thread. I am fairly new to tatting and have been tatting over two ends and it is very bulky and frustrating. I am going to try you technique next time I have to start a new thread.
Your giveaway items are fantastic! Thank you for having this giveaway! Please enter me in!
Blessings,
Diane
Very clear instructions so here I am!!!
ReplyDeleteThe way you add a thread is exactly the same as I do it!! I've only ever used the magic thread trick twice and both times the darn end popped back out!!! Like you - I like a knot and this type of slip knot is so much slimmer than an overhand one. Great, clear explanation and I WANNA win one of the gifts too!!!!! Cheeky moo that I am!!
Congrats on your 100th! Love reading your blog, so much useful info. A great giveaway too :)
ReplyDeleteThanks so much for posting this tute! I haven't worked much on adding new thread as it kinda scares me. There's only so much you can tat that doesn't require adding thread at some point!
ReplyDeletecongrats on the 5000 hits and the 100th post. those are both awesome prizes and I would LOVE either one
100 posts! Congratulations! I would love to win one of your giveaways! Thanks for the chance.
ReplyDeleteWished you post this last night else I would have practiced your way. Yummy - if I could choose I would love the second giveaway.
ReplyDeleteHave I ever told you that I am in love with you? Because of you latest post, I am!!! Thank You!!! Thank You!!! Thank You!!!!! I just arrived at this point last night on a doily that I am working on and I stared at it dumb founded! Your tutorial of adding on new thread has made me sane! Well.. that would be a stretch! (LOL)
ReplyDeleteHey, thanks for the information on the knot. I never could get a weaver's knot to work -- but a slip knot and a "pop" -- even I should be able to do that!
ReplyDeleteI'd like to have either of those collections of goodies you're giving away. Marvelous stuff! Please enter me into the random number thingy.
I have used this same weaver's knot for lots of lacemaking opportunities. Generally for bobbinlace to add a new thread or leader thread to keep the bobbin in line until I am done and then can detach it. I try not to have knots show in my Blace or tatting(kind of silly since Tatting IS knotted). I will use the knotless method which you can see in my instructions: http://www.tat-man.net/tatterville/howtotat/add-new-thread.html
ReplyDeleteAnd congratulations on your Centiblog!!!! Thanks for the giveaways. They are awesome!
You teach us to attach a new thread (I never thought of putting one end in the ring, another in the chain, thank you a lot!) and offer give us a gift? Wow, thank you twice! My e-mail is mabelistas at gmail.com
ReplyDeleteCongratulations! Quite a milestone, isn't it?
ReplyDeleteFantastic Give-away! Count me in please!
Fox : )
congratulations on your 100th post. that's impressive. i would love to win some hdt. or whatever you choose. thank you for your generosity. please enter me in the giveaway.
ReplyDeletehappy tatting!!!
shirley b.
Congratulations!! On the 100th post. I've been watching you blog for a while. Your work is so neat. Thank you for your give away. I'd love to be entered in it.
ReplyDeleteI would love to win one of your giveaways!
ReplyDeleteWoot! woot! what awesome giveaway prizes. I would like to win the Giveaway B for the shuttle but either one would be just grand.
ReplyDeleteYou can contact me through my blog.
Jon
Congratulations on your 5000th hits and your 100th post. I have not been tatting long and it has always worried me regarding adding new thread without knotting it - I will give your tutorial a go and hopefully it will put my mind at rest.
ReplyDeleteThank you so much for opportunity to win some goodies they are both FAB giveaways.
Thanks again
Lisa
I have to get in on this one. Congratulations on your 100th post. I'm at beadymom at gmail dot com.
ReplyDeleteyour blog is really nice and informative. My only problem is that I had to highlight it all to see it -- light grey doesn't show up good but, was worth it and yes I'd like to win! Thanks!
ReplyDeletelynn@tangledyarn.com
Thank you for all the inspiration you provide on your blog! I'd love to be entered in your give away!
ReplyDeleteakaber9598 at att dot net
Excellent tutorial and what a generous giveaway! It's been a pleasure reading the past 100 posts and I'm sure the next 100 will be as good!
ReplyDeleteGreat tutorial!Thanks!Of course I will enter this giveaway.
ReplyDeleteGreetings from the very south of Sweden!
http://tanttat. blogspot.com
Nice tutorial! Adding thread is one of things that I still don't like having to do so I appreciate seeing how other people do it.
ReplyDeleteI'd love to be entered into your giveaways! Thank you.
janers41 at yahoo dot come
i would love to be entered into your drawing...
ReplyDeletei have also had my thread come out of its hold... i was so upset when it happened... i'm more careful now but the know seems like a better solution.
WooHoo 100 posts! Congratulations!! Also a very nice tutorial on adding a thread. And two very generous giveaways. I'd love to be entered. Thank you so much!!
ReplyDeleteCarol Lawecki
I will have to try the slip knot method for adding thread the next time I need to add thread!! I would love to win a giveaway :)
ReplyDeleteOoh I like your word-coining on the title. Congratulations! I would love to be entered for your drawing.
ReplyDeleteThe tutorial is very interesting. I feel the same unease about joining threads without a knot, so I usually join them with a square knot. But that can get pretty bulky, so I'm going to have to try the slipknot method.
5000 hits and 100 posts - WOW 2 SPECIALSat once. Loved the tutorial - I agaree adding one end in the ring and the other end in the next chain works best. Both giveaways are "something special" and I would be honored to win either one. Many thanks for all your many tips.
ReplyDeleteThank you for the chance at your giveaway.
ReplyDeleteAs a new tatter, I appreciate the instructive post. I haven't been knotting my new thread on and have been a little worried about it, especially since I'm not so good at hiding ends. I also appreciate the link to the video about hiding ends! That will help a lot. Congrats on the 100th post and the 5000th view. I'd love to be entered in the giveaways, thanks for having them!
ReplyDeleteUsing a knot when re-attaching shuttle thread never even occurred to me! I'll have to try it the next time it happens, if just to see how it looks/feels to do. What fantastic little items in your giveaways! Oh, to be that random number...
ReplyDeleteLoved your tutorial on adding a thread. Great pictures and instructions. Also your snowflakes/motifs were lovely. Especially liked the Ice Crystal one.
ReplyDeletePlease enter me in the giveaway.
Queen Tat Pat
karpap at cox dot net
I've never tried your method of adding thread. Thanks for the tutorial... I will try it!
ReplyDeleteWhat a fabulous giveaway! Please enter my name! Congratulations on 100 posts. Isn't it amazing how quickly the posts add up?
First of all congrats!! great tutorial...& thanks a lot....superb giveaways...Pls count me in your giveaway..I would love to win...thanks.Edna
ReplyDeleteI never ever ever win anything so I doubt I will win this but I would love to be entered... I'm esp interested in the second give-away as I can't usually order from handy hands and I would love to try hand dyed threads... my contact information can be found on my blog
ReplyDeleteBrooklynne
First congrats on 100 posts! I am flabbergasted on your generosity! I would love to be entered in your giveaway. Thank you for the thread adding trick! Very easy to understand.
ReplyDeleteThank you for the great tutorial - what a terrific 100th post.
ReplyDeleteI would love to win either giveaway - especially the snowflakes (I want the pattern for Angels in the Snow so much but maybe having the snowflake will be enough).
That was agreat tutorial and please include me in the giveaway.
ReplyDeleteCongratulations on your 100th post!
Congrats on your 100th post......and thanks for the information on the weavers knot......I use that knot in my bobbin lace
ReplyDeleteHugs
Joy in OZ
Very clear instructions! Yes, oh yes PLEASE enter me into your incredible giveaways!
ReplyDeleteYou can reach me through my blog ambitatterous or by isdihara at verizon dot net. Both work great.
Congratulations on reaching two blogger milestones! I remember fondly when you were the new lacer on the block. *sigh* It happens so fast.
Looking forward to your next 100 posts and beyond. !
Great blog! Wow, how do you count your visitors?
ReplyDeletePatricia
Congrats on #100!! I'll most definitely have to try your way of adding a new thread as I have been messing up a lot lately. I'd love to be entered in your contest. Not too sure my email addy is on my blog, so I'll post it here! crasshtesst (at) yahoo (dot) com. Yes, with double S in both words :) Thanks!
ReplyDeleteCongrats on your celebrations!!
ReplyDeleteI need to check mine to see how close I am! eek!
anyway, I would love to be entered in your giveaways..
Carol aka battatter
Congratulations on your blog double achievement!
ReplyDeleteThank you for your lovely giveaway.
.
Congrats on your 100th post..before you know it'll be 300! Oh wait that's just me..lol..that sure is nice of you to have such a generous giveaway. The tutorial you placed was very clear and helpful. Pictures are always helpful to new learners of any craft, visuals gotta have visuals for my mind to comprehend things.
ReplyDeleteCongratulations! Good tutorial. It's similar to how I do it. I'd love to be entered in your draw. Thanks for having this.
ReplyDeleteJeff
congratulations on your Blogaversary and number of visitors. That is great!
ReplyDeletevery good tutorial on adding thread and tatting over tails.
please enter me in your givaway drawings. my email is in my full profile on my blog.
Thanks
Jeanne
Thanks for sharing advice on joining thread. Your giveaways look very generous. Please enter me for them. You can contact me through my blog.
ReplyDeleteYour tutorial was very well written, I'll have to try it out.
ReplyDeleteCongratulations on your milestones. I'd love to win either of your giveaways, both are great prizes.
Deb
debinwv at yahoo dot com
Congratulations on the double milestones! What lovely prizes!!
ReplyDeleteCongratulations on your Blogaversary and your vistor count, Wow 5000, that's great!
ReplyDeleteThank you for the great tutorial. I just sent the link to my sister who is a new tatter.
Thanks so much for this tutorial. I'm making a hanky edging and have almost run out of thread so will give this a go.Congrats on your 100th post and thanks for the chance of winning one of these great prizes.
ReplyDeletepamelapaice(at)ntlworld(dot)com
hi girl.. FIRST congrats for your 100th post.. so much!! and go on for the next 100!!! and here i am.. joining your giveaway!! your blog is fantastic.. so . .have fun!!!
ReplyDeleteclau
Sign me up!!! And thanks for the instructions. I always tie knots, but mine look huge and bunched, so I always have lots of thread so I won't run out, then end up with tons of extra thread in small amounts (yard or two) that I can't use on another project. NOW, I think I shall try it and see if I can't work in those extra threads. Thanks.
ReplyDeleteIt took me forever to figure out that "knot" years ago. What good photos! and I love your Lucky Clover- it is on my "Iguana" list. what a lovely drawing.. glad to be entered.
ReplyDeleteHope Green love2tat/gmail.com
100 posts... and 500 times read! Congratulations!
ReplyDeleteYour tatting is very impressive and well worth to be looked at.
Please count me in your very generous giveaway.
Greetings from Germany,
Anke
Hello and congratulations! I'm a new tatter. My sister is trying to help me figure all this out and pointed me to your website for this amazing tutorial. I would love to win one of your great prizes :) Thank you for the opportunity!
ReplyDeleteseroskie(at)juno(dot)com
oooh, oooh, ooooh..pick me, pick me. Congrats on your 100th and 5000th! Happy Tatting!
ReplyDeletetattingjohn
Great tutorial; great pictures and descriptions on how to add thread!
ReplyDeleteCongratulations on your milestones! Isn't tatting a wonderful art that brings us together?
What a clever method to add more thread! I will definitely add this to my repertoire. :) Can't believe a slip knot never occurred to me since I use them to start my knitting so often...
ReplyDeleteYour snowflakes are gorgeous!
Double congratulations, Miranda. And your tutorial is clear and very understandable.....thank you.
ReplyDeleteI would like to be included in the drawing for the beautiful gifts. Hugs, Jan YesterYearDesign at live dot com
Great Blog, Miranda! Keep up the good work! I'd love to win either of the giveaways :-)
ReplyDeleteYuma Tatter
Congratulations on such a clear description & on 100 posts - both are quite an achievement!
ReplyDeleteI would love a chance to enter either of your giveaways please. Thank you for being such a generous person - not just with the giveaway gifts but by taking the time to produce such clear instructions.
With anytime you have left - any chance of the pattern for Ice Crystal?!!!!!! :)
Congratulations on your 100th post and your counter passing the 5000th visitor. Enjoy reading your blog. Would love to take one of your prizes off your hands. Thanks in advance. Robert Kent, in northern Iowa. (rjkent at netamumail dot com.
ReplyDeleteThank you for the lessons and great giveaway.
ReplyDeleteilene1232 at attnet
I love the way you explain the added thread. I'd also love to enter you contest. I've been tatting for quite some time (Little over 45 years) Congrats on such a fine blog and great attendance on it.
ReplyDeleteGod Bless,
Scott Hoover
tshvlh@brightok.net
Oh Congratulations! And Thank you for the really nice illustration!
ReplyDeleteI would LOVE to be entered in your drawings. Thank you for such a wonderful drawings. I wanna win one of these for my birthday lol!
Congratulations again!!!
That is a great tutorial and a super giveaway.
ReplyDelete....cbeers to your wonderful accomplishments.. this is just ** tatty-lishious ** thanks for the opportunity...( mitz_zee@yahoodotcom)
ReplyDeleteCongrats on your 100th post! they do add up rather fast, don't they? I also love your tutorial. I shall add it to my list of online resources to refer my students and newbies to. It's my favorite way to add thread mid-project too :-) Tat on!
ReplyDeleteGreat photos of the technique and clear instructions. I teach this toward the end of beginning tatting lessons because I was frustrated as a new tatter when I neede additional thread to complete the small product I was making. Size 10 thread is great to learn to tat with, but only a small amount fills a shuttle.
ReplyDeleteCongratulations on you milestones of blog achievement!
Jeanette
bobbysgirlpurple at yahoo dot com.
Congratulations on the double milestones!
ReplyDeleteYour tutorial looks clear and easy to follow. Will try it next time I tat. So far I'd been sewing in the ends...
Pls count me in for your wonderful giveaway. Awesome treats!
Val
Congratulations on your milestones, and thank you so much for your tatting instructions for adding a new thread.
ReplyDeletePlease count me in on your awesome giveaway
That's a wonderful tutorial! The pics are a great help.
ReplyDeleteThanks for doing a giveaway & congrats on all the posts you've done.
Congrats on your blog! I would love to be entered in your giveaways! Thanks! :)
ReplyDeleteJust in case...
alizandriat@yahoo dot com
Could I be lucky "75"!!Congratulations on the 100th post. Looking forward to the next 100.
ReplyDeleteYou always have awsome give aways!! I have seen so many ways of hiding threads and I will have to give yours a try. I usually use a self threading needle and take one end one way, back stitch and the other thread the other way.
Would love either but like many the David Reed
Shuttle is the one! It will be on my gift list.
Linda NM
I would love to enter my name. That was a nice tutorial for new tatters.
ReplyDeleteElizabeth
LeVert92 at aol dot com
Thanks for the tut - I've been joining new thread to the end of a ring... I will have to try this concept as I think it looks more uniform
ReplyDeleteAs far as the give-away rules: All clear, captain!
Congratulations on your 100th post, and thanks for a handy tutorial!
ReplyDeletePlease enter me in your draw, if I'm not to late to the party :)
Thanks for the tutorial...needed that!
ReplyDeleteCongrats on your 100th post..WOO HOO!
Kimberly
kinters6(at)aol(dot)com
Congratulations on your two milestones! You have a very nice, clear tutorial for adding thread. I'll have to try it.
ReplyDeleteI could hardly believe the wonderful things you are giving away! Wow! I'd be tickled pink to win either one!
My contact info is on my blog profile
Hi hun, I absolutely love the instructions on how to do a join for new thread, normally i start completely over because I just don't do joins very well. I really appreciate the clear visual instructions, tyvm.
ReplyDeleteBree
Congratulations on your blog and achievements. I have not tried joining a new thread like that, so something to try. Your give aways are very generous.
ReplyDeletehappy tatting
Josie
Congratulations on your 5000 hit counter --- that is fantastic! Lovely tutorial, too. I'm still learning & enjoy seeing the pictures with the verbal instructions. All very helpful.
ReplyDeleteAwesome giveaways, too! Please include my name, too. Always, L.
leliaevelyn
(at) gmail (dot)
com
I'm a beginner tatting and find the amazing creations!
ReplyDeleteUnfortunately too late for the giveaway presents but it's been nice
to see what others can do!
Thanks
Greetings from the Netherlands