"But, really, why does anyone create? You feel a... a restlessness inside, a need to make something new, something no one has ever seen before. You want to add to the beauty and the richness of the world with a gift, an offering that is uniquely yours. It's an act of selfishness and generosity, all rolled into one."

-- Bruce Coville,
The Last Hunt

Tuesday, April 26, 2011

Early Mother's Day

I can show this year's Mother's Day gift early, because I've already given it. I'm seeing her now, but not on Mother's Day.


This is Marilee Rockley's "Carnival" pendant, from the book Boutique Tatting. I used Krystledawn's "Of Berries and Fairies" HDT, which contains nearly all of my mom's favorite colors. The small seed beads are Miyuki delicas silk finish in a very pale blue. The slightly larger mauve-y ones are Czech, and I think the large round one is also Czech. I'm not sure about the make of the teardrop, but it's such a beautiful shade of blue (this photo does not do it justice) that after I had used this one I had to go back to the bead shop and buy some more for my own stash.

By sheer coincidence, this pendant happens to look perfect with the dress my mom is planning to wear to my cousin's wedding.

P.S. I gave my Grandma the Five-Petal Pendant yesterday. She was quite thrilled with it, and thinks that the magnetic clasp is the neatest thing ever.

Friday, April 22, 2011

Oooh, Sparkly!

So, my cousin's wedding is coming up in just over a week. It will be outdoors, weather permitting. There are numerous reasons why outdoor gigs are a bit of a hassle for harpists. We usually don't complain, except to each other on the Harplist. But the one thing I absolutely will not tolerate is my hair blowing in my face while I'm trying to play. My hair is very long and somewhat curly, so all those silly little clips and combs and bobby pins from the drug store are completely useless to me. Having no desire to drive all over town looking for an acceptable hair accessory, I decided I could make my own.

Naturally, it has to match my outfit, which in keeping with musicians' tradition will be black. But the hair accessory can't be plain black, because that looks stupid against my dark brown hair, neither blending nor contrasting. So I decided on black with some sparkle.

Start with a plain, ordinary barrette.


Cover it with pearl tatting in size 20 black Lizbeth.


Size 20 so that the somewhat sharp edges of the barrette don't wear through it too quickly. Pearl tatting for two reasons. First, so that there will be double stitches on both sides of the barrette for symmetry and a finished look. Second, for picots. I didn't want to spend a lot of time working out how many DS I would need between joining picots; I just wanted to have a picot there whenever I needed to join. In pearl tatting, there's automatically a picot after every DS on each side. That's why it's called pearl tatting, in fact; "pearl" is an archaic term for "picot".

Finally, add an edging in black and silver threads with beads.


I know it's not the greatest picture; it's late and I don't feel like looking for a better background. You get the idea, though. The edging is Number 15 from Anne Orr's Classic Tatting Patterns. The threads are black Lizbeth size 80 and silver Coats and Clark metallic. The beads are Miyuki delica seed beads in hyacinth and 3mm stardust silver beads. I should have also put a seed bead on the free picot of each large ring, but I didn't think of that until after the shuttle was already wound.

The two threads together tatted up around the size of a size 20, primarily because I loosened my tension so much so as not to break the metallic. I probably could have tatted a little tighter, but I really didn't want to deal with a lot of broken ends so I played it safe. I had no idea it would end up so nicely centered, either; it was just one of those "start tatting and hope for the best" things that happened to work out.

Tomorrow morning I go for one final practice session on a friend's harp, which is much more similar to the harp I'll be renting (no way am I flying with my harp) than mine is. Then laundry, packing, and off I go!

Sunday, April 17, 2011

Playing with Petals

Yesterday I mentioned that I had been playing with Marilee's "Five-Petal Pendant" pattern. When I first saw the design, the first thing I thought of was a dogwood. The petals were exactly the right shape; all I had to do was figure out how to make only four of them.


Very nice, but all the decorative picots that look so pretty on the 5-petal version are distracting here. Plus, I used too small of a bead in the center (3 mm instead of 4).


Hmm, I thought I would like it better with no decorative picots, but I don't. I had to leave the decorative picots on the inner round because they help fill in the petals; having none on the outer round is too much of a contrast. Also, not having a picot on the short chain between petals somehow separates the petals too much.


Here I found the right number of picots to make it look balanced. This one makes me happy.

I used size 20 Lizbeth in White and Dusty Rose Light (621). The center beads are Czech faceted 4 mm in a light green. The other beads are Miyuki Delicas satin finish in "Linen" color. If I do this again I'll try to find a bead that is a bit more of a true tan.

Now for the tricky part-- how to explain what I did in a way that people who have the book will understand, but not give away the pattern to anyone who hasn't bought the book. On the central SCMR, I made only 4 picots; adding one extra DS between them will space them evenly without significantly changing the size of the SCMR. In round 1, I compensated for this extra DS by also making an extra DS between petals. The stitch count on the petals is exactly the same. In round 2, the total number of stitches per petal is the same; in the final version, I left out the middle picot in each long chain. The short chain between petals is also the same; because it has to reach a little bit farther between the petals, this causes the flower to cup just a little, like a real flower.

Saturday, April 16, 2011

Know Your Audience

That's the mantra for every performer and writer. The corollary for crafters is, when making a gift, know the recipient.


In this case, the recipient will be my Grandma, whose birthday is coming up soon. She has macular degeneration, which means that what she sees best is bold, solid, primary colors with a lot of contrast. She won't be able to see the detail of the stitches, but she will be able to see these colors and the shape, and she'll be able to feel the beads.

This is the "Five-Petal Pendant" from Marilee Rockley's book Up and Tat 'Em. I've been doing a lot of Marilee's patterns lately. I swear she's not paying me. The threads are Lizbeth Victorian Red (670) and Ocean Turquoise Light (658).

The pattern just calls for one color, and it is much easier if you can start CTM. Since I wanted contrast, I started out by finger tatting the SCMR around the center bead, using the end of the red thread like a shuttle; that way I basically was starting CTM. I continued finger tatting the first chain after the SCMR, and when I got to the first ring, I attached the turquoise thread to the red tail and tatted over the tails. Where the chains in the first round join to the center SCMR, I used slope and roll joins to avoid the color blip that would happen with lock joins.

Grandma also has arthritis, so I didn't want the necklace to have a fiddly clasp. A good strong magnetic clasp is perfect.


Right now I'm playing with Marilee's design a bit. I'll show you the results soon.

Thursday, April 14, 2011

What Will We Do...

... when e-book readers take over the world? It would be a shame never to tat another bookmark.


Both of these are designed by Jon Yusoff. On the left is "Two by Two" in Lizbeth Caribbean and Royal Blue, and on the right is "Chinese Coin Bookmark" in Yarnplayer's "Forest" HDT. I improvised tails for both of them, rather than try to make tassels, because I hate that.

One of these is for me, and one is for a friend. I'll let him pick which one he likes best. I suspect it will be the green one, which is a pity because that's my favorite too.

Monday, April 11, 2011

Awwww.....

Mutual grooming is one way that cats show affection for each other. When you pet them, they interpret that as grooming, and so when they lick you, they're really just petting you back.


Also, when they rub against you, part of what they're doing is marking you as their territory by leaving their scent on you. It's only fair, you know; we use collars and tags and microchips on them. Every single day, as soon as I get out of the shower, Squijum is right there rubbing all over me. Having just washed all his scent off myself, you see, I must immediately be re-marked.

Usually Squijum strews my tatted pieces across the living room during the night. Last night he decided to stack them neatly instead.

Sunday, April 10, 2011

Daisy Picots and Maltese Rings


Somebody was feeling very energetic this morning.


This little butterfly I posted a couple of days ago got me thinking about the differences and similarities between daisy picots and Maltese rings. Both involve making unflipped double stitches on a ring, using a second thread. With daisy picots, the unflipped DS are made on the knotting thread, i.e. the thread wrapped around your hand. With Maltese rings, the unflipped DS are made on the core thread.

In all of these examples, the yellow is the core thread.

To make a daisy picot, start a ring normally. Then, using the second thread, make an unflipped DS over the thread wrapped around your left hand. Make the half stitches in the usual order, behind first, then in front.


The stitch will look backwards at first.  But then you will drape the second shuttle over the back of your left hand. This will twist the stitch around so it looks right.


I wanted to show a picture of this on my hand so you could really see what I'm talking about, but I couldn't hold the camera steady enough with one hand.

What you end up with here is a picot that carries a double stitch. How cool is that? When the ring is closed, it looks like this:


To make a Maltese ring, start an ordinary ring. Then move the circle of thread a little farther down on your left hand so that you can hold the shuttle (core) thread taut between any two fingers. Using the second shuttle, work an unflipped DS over the core thread. This time you will have to reverse the order of the half stitches, like you do on the second half of a split ring.


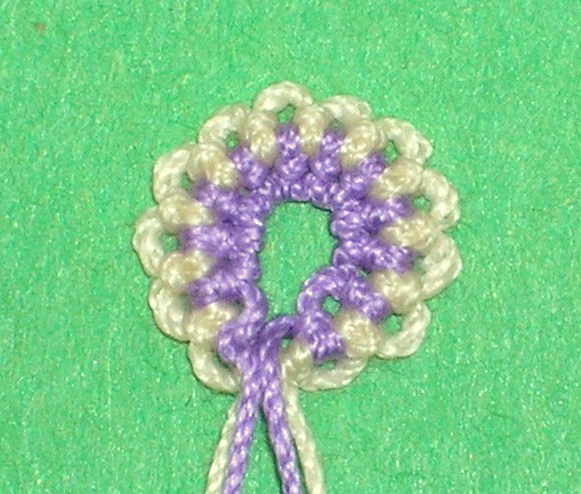
Just let the second thread dangle when you're done with it. What you end up with here is basically pearl tatting in a ring. The closed ring looks like this:


This ring is so small that the Maltese stitches fill up the inside, making it look solid.


Larger Maltese rings have a nice frilly look.

With either technique, you can of course increase the stitch count for a different look.


Here there are eight stitches on each daisy picot, and you can see why it's called a "daisy" picot.


This Maltese ring has alternating sets of three DS. It will close more easily if you loosen your tension a bit. If I were going to tat the sun, this is how I would do it, using yellow and orange.

You can also alter the look by varying the stitch count of the normal stitches and adding ordinary picots. When I started this daisy picot ring, it didn't even occur to me that it would look like a butterfly.


When I realized it did, I reworked it.


To make this butterfly, start an ordinary ring, leaving a long tail. R 2, daisy picot 2-2-2-2, continue same R 1-1, daisy picot 3-3, continue same R 1- (longish picot) 1, daisy picot 3-3, continue same R 1-1, daisy picot 2-2-2-2, continue same R 2. Close ring. SR 3/3, using long tail from the start to finger tat the second half. Trim ends of SR to make antennae, hide ends of second thread.

Here is a Maltese ring showing different stitch counts and picots.


It's... unique, isn't it? I'm sure it must be good for something. Let me know if you figure out what, won't you?

Finally, I got crazy and combined daisy picots and Maltese stitches in the same ring.


These two rings have identical stitch counts. For the one on the left, I passed the purple thread in front as I moved from daisy picot to Maltese stitch and vice-versa. For the one on the right, I passed the purple thread in back. I think there are interesting design possibilities here.

For both of these techniques you could also add a third thread to intertwine colors, like in that tiny butterfly that started this whole experiment. You could also use either technique on a chain, which would also require a third thread; the Maltese technique on a chain would simply be pearl tatting.

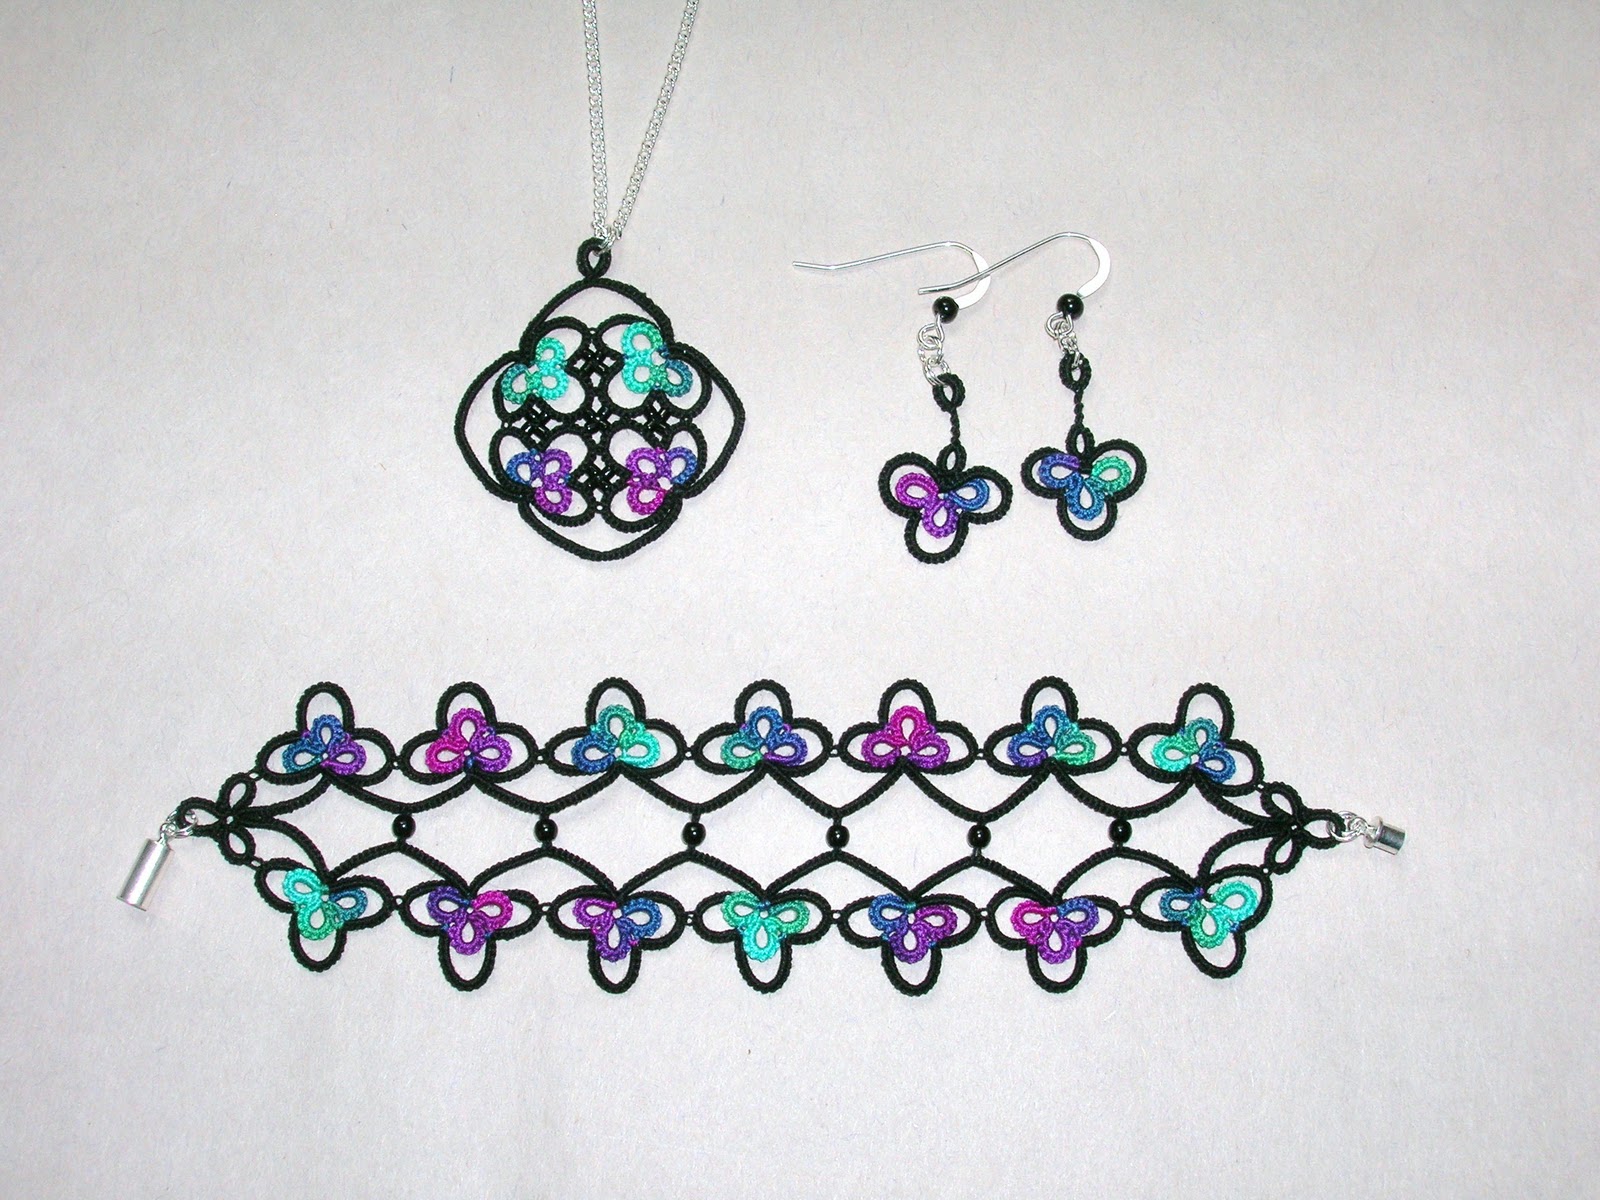
A few years ago, I designed this:


It uses daisy picots and a couple of other advanced techniques. I have to admit that I have only ever managed it twice without mistakes (the top two out of these three). I've never distributed the pattern, because I figure if even the designer has trouble tatting it, it's probably just way too hard. If you're up for a big challenge, though, I'm happy to share.

Saturday, April 9, 2011

Don't Let Fear Rule Your Tatting!

Motif 49 from The Tatted Artistry of Teiko Fujito, done in Lizbeth size 80, colors 632 Medium Purple, 663 Bright Turquoise Dark, and 604 Black. It measures about 4 inches (10 cm) in diameter.

I managed not to destroy it this time around. I did make one tiny little mistake, though. Can you spot it? It's such a little thing that I think I'm OK with it and won't have to re-do that section. I think.

When I first showed the picture of restarting this motif, here, several people commented that it looked intimidating because it required three shuttles. I want to point out that it's really no different from any other tatting, because you only work with two shuttles at a time.


Here you see that the black thread is completely out of the way, and you're just working with the purple and turquoise.


This shows where you are right before you change colors. At this point, I have reversed work to put the black thread in working position. The turquoise thread will be dropped.


Leave a short space of unworked black thread before making the first black stitch. Then continue working with just the black and purple shuttles until it's time to switch back to turquoise.

See, it's not complicated at all. So don't be afraid of things that look out of the ordinary. Analyze the pattern and the picture, and you'll probably find that you can do it quite easily.

Friday, April 8, 2011

Tiny Tat

I made this last night from the threads that were left on the shuttles after the motif that I started on Tatting Day.

It does sit symmetrically, but it got a little squashed in the scanner. It's from the book Butterflies Migrating by the Palmetto Tatters; unfortunately, the actual designer is not listed.

It uses the technique of daisy picots, but with a twist. The upper wings alternate threads so that the daisy picots are in two intertwined colors; also most of the daisy picots are only one stitch, so that they don't reach that petal shape that gives them their name.

In three size 80 threads, it's a little bit smaller than an American quarter.

As for the motif, I just have to finish the chain around the edge and block it. It should be ready for show and tell by tomorrow.

Saturday, April 2, 2011

Stained Glass

The "Wondrous Window" set, designed by Marilee Rockley, using Marilee's "Stardate" HDT (which has all of my favorite colors in one thread!) and black Lizbeth.


I'm very happy with the way these turned out, particularly the pendant. I was really a bit nervous about the pendant. This is the woven beaded picot variation, and I wasn't sure it would come out right. You see, the pattern calls for size 10 seed beads and size 20 thread, and as Marilee says, proportion is very important in this pattern. Well, what I had available was size 11 beads, size 30 HDT, and size 40 Lizbeth. (I do have size 20 black Lizbeth as well, but since I had to choose, I decided the black thread should be smaller than the colored thread. For some reason, I have no size 30 black of any kind in my stash.) It came out just fine, though.


There were a couple of teensy things I did differently. At the beginning of each outer chain, I joined to the base of the previous outer chain. That way, there is no visible break between the two chains; it looks like the outline is drawn, as it were, without picking the pencil up. Otherwise you would see the division between the outer chains where I stopped to chain around the trefoil. Also, I made that floating ring at the top as a loop-tatted ring so that I didn't have to use a second shuttle.

On the bracelet, the thread size made a real difference. Marilee's bracelet only has five trefoils along each side, while mine needed seven to achieve the same length.


For the inner chains of the bracelet, I also joined to the base of the previous inner chain, for the same reason. I also started differently. The pattern tells you to start at the black clover at one end. However, when I'm working in two colors I prefer to end at a spot where both colors come together. This way I can hide each end in the matching color; if I don't it sometimes shows a little bit. Therefore I started at one of the trefoils instead.


I took a slightly different approach to the earrings. Instead of keeping the HDT as the core thread on the chains, I hid both ends in the rings and started fresh using continuous thread method for the black parts. No particular reason, it just worked for me. After making the chains all the way around, I cut off the ball thread with a long tail. Just like Marilee's instructions, I used this tail to finger tat the second half of the split ring. I converted the top ring to a single shuttle split ring in order to hide the ends.

None of this is any better than how Marilee wrote the pattern. It's just a different way of doing it, with the same result.

I love the stained glass look of this set, and I think that you really need to use a hand-dyed thread to get the full effect. The way the colors blend together in an HDT gives it a character that commercially dyed threads can never achieve.

I was also interested in the different variations of the pendant. There's the basic version with no beads and no decorative picots, just smooth, clean lines. This looks very elegant with the black outline. Then there's a version with lots of decorative picots. To be honest, I didn't think the picots went as well with the stained glass look; glass is smooth, not frilly. But I could envision the picot-y version in soft pastels, using the same thread for both rings and chains.


This is the pendant with lots of picots in Krystledawn's "Fairy Faint" HDT, with just a few white beads added. It hardly looks like the same pattern, does it?

Friday, April 1, 2011

Happy Tatting Day!


All worn out from a hard morning of eating, getting petted, and looking at birds out the window. Life's rough. Oh, and he had to push that box out of the way, too. It normally sits right where he is here so he can play in it whenever he wants to but I won't trip over it. But this morning it was in the way of the sunny spot, so it had to be moved.

So what did you do for International Tatting Day?

In the morning I did some more work on the Wondrous Window set. I almost finished the bracelet, but I had to stop so that I could get to the coffee shop at a reasonable time to sit there and tat for a while. Yeah, my life is rough, too.

I don't like to work with beads outside my apartment. I'd rather not become known as the Crazy Bead Lady, chasing all over the coffee shop and crawling under other people's tables after runaway beads. Therefore, I chose to put the bracelet on pause and work on something else for my act of public tatting today. I will finish the bracelet and maybe the earrings tonight.

Remember the temper tantrum I threw back in December, when I broke a core thread while sewing ends in? I decided then, and still feel, that in that particular case retatting the chain would have resulted in too many ends in too small a space, and so there was nothing to be done about it. I always knew I would come back to the motif, though, and today I started it again.


Motif number 49 from The Tatted Artistry of Teiko Fujito. It's not as complicated as it looks. The shuttle with the lavender thread on it is used throughout, but the black thread stays at the inside and the turquoise stays at the outside; you just let the extra shuttle dangle when you're not using it.

I also wore the "Belle" pendant that I showed earlier this week. And I was able to get my chocolate in cupcake form and eat it with a fork, so my tatting was safe.

A couple of people did ask what I was doing. We had a nice little chat, and I gave them each a motif from the grab bag that I always take with me when I tat in public.

I hope everyone had as nice a Tatting Day as I did!