Unfortunately, I never heard from Texas Stardust, so I had to choose a new winner for the Giveaway B. I do feel sorry for Texas Stardust, but I also feel that I have made reasonable attempts to contact her and given her time to respond.
So, the new winner is Singtatter! Congratulations!

Sunday, October 31, 2010
Friday, October 29, 2010
Calling Texas Stardust
I have not yet had any luck contacting Texas Stardust regarding her prize. If anyone knows how to get in touch with her, please ask her to e-mail me! I need her mailing address to send the prize to.
If I don't hear from Texas Stardust by Sunday, I will select a new winner.
If I don't hear from Texas Stardust by Sunday, I will select a new winner.
Thursday, October 28, 2010
The Winners!
The virtual drawing has been held and the winners notified. There were a total of 84 entries. I used the random number generator at random.org to select the two winners.
The winner of prize A is number 48, Martha. Martha has won the snowflakes, HDT samples, crochet hooks, beads, and scissors. Martha, I still have your mailing address and will mail your prize tomorrow.
The winner of prize B is number 59, Texas Stardust. Texas Stardust has won the blank cards, Handy Hands gift certificate, David Reed Smith shuttle, and two skeins of HDT. Texas Stardust, I need your mailing address, so please e-mail me ASAP.
Congratulations to both winners!!!
Wednesday, October 27, 2010
The Clock Is Ticking!
I haven't posted in several days because I wanted to keep the giveaway post at the top of the blog. This is just a reminder to the procrastinators, you only have one day left to enter! All you have to do is leave a comment on the post immediately below this one.
I've gotten some good out of this giveaway too. By getting comments from a lot of people beyond the usual suspects, I have been able to find several interesting blogs that I hadn't read before, which I am now following. Yay, more eye candy for me!
Being basically a low-tech kind of person, I had thought of printing the comments out and numbering them by hand. But when the numbers got higher than I can count on my fingers and toes, I decided I'd better have the computer number the entries for me. So a HUGE thanks to Gina, who very kindly sent me the link to http://www.mommymoment.ca/2010/03/numbered-comments.html, which gives instructions for doing just that.
I had a tatting sighting this week, too. I was watching Sherlock Holmes-- not the recent movie, but a series of shorts that I'm sure many of you remember being broadcast on PBS (and I assume the BBC also) years ago, and which is now streamable on Netflix. In the episode "The Crooked Man", the character Nancy Barclay wears a dress with quite a bit of tatting around the neck, very appropriate to the period. Given the Victorian setting, there was of course lots of lace throughout all the episodes; I thought I caught glimpses of tatting a couple of other times, but they weren't close enough shots to be sure. For some reason the camera kept focusing on minor details like the characters' faces instead of important things like the lace. ;)
Here's a little something I tatted while watching Sherlock and Dr. Watson:
 The thread is "Purple Glory" by Yarnplayer. The beads are Miyuki Delicas size 11, in the "silk" finish. I've recently purchased beads in this finish in a variety of colors, and I really like them. You can't tell in the photo, but they have a wonderful moonstone-like luster. The pattern is "Kejora" from Jon Yusoff's book Tatting with Rings. This was the first time I had worked anything from this book, and as you can see, I kind of squashed the center motif a bit. I'm happy with the actual covering of the ring, though.
I'd like to make a pair of earrings using another of the patterns from this book, and another of Yarnplayer's threads, just as soon as I find where I put my earring findings. I could have sworn I had them in the same box with all the other findings.
Don't forget to check back tomorrow evening, when I will announce the winners.
I've gotten some good out of this giveaway too. By getting comments from a lot of people beyond the usual suspects, I have been able to find several interesting blogs that I hadn't read before, which I am now following. Yay, more eye candy for me!
Being basically a low-tech kind of person, I had thought of printing the comments out and numbering them by hand. But when the numbers got higher than I can count on my fingers and toes, I decided I'd better have the computer number the entries for me. So a HUGE thanks to Gina, who very kindly sent me the link to http://www.mommymoment.ca/2010/03/numbered-comments.html, which gives instructions for doing just that.
I had a tatting sighting this week, too. I was watching Sherlock Holmes-- not the recent movie, but a series of shorts that I'm sure many of you remember being broadcast on PBS (and I assume the BBC also) years ago, and which is now streamable on Netflix. In the episode "The Crooked Man", the character Nancy Barclay wears a dress with quite a bit of tatting around the neck, very appropriate to the period. Given the Victorian setting, there was of course lots of lace throughout all the episodes; I thought I caught glimpses of tatting a couple of other times, but they weren't close enough shots to be sure. For some reason the camera kept focusing on minor details like the characters' faces instead of important things like the lace. ;)
Here's a little something I tatted while watching Sherlock and Dr. Watson:

I'd like to make a pair of earrings using another of the patterns from this book, and another of Yarnplayer's threads, just as soon as I find where I put my earring findings. I could have sworn I had them in the same box with all the other findings.
Don't forget to check back tomorrow evening, when I will announce the winners.
Friday, October 22, 2010
Centiblog? Centipost?
This is it... the moment you've all been waiting for (stop rolling your eyes, you in the back)... my 100th blog post! There should be a word for this, but I don't think that either "centiblog" or "centipost" is it. Also, a couple of weeks ago, Friday October 8 to be exact, my hit counter passed 5000. This means a double celebration!
But, one of the rules I made for myself is I'm not allowed to post a bunch of fluff just for the sake of getting to 100. There has to be a reason for the post. I thought I'd do a tutorial on joining on a new shuttle thread, because I know this is something new tatters have trouble with. There are several reasons why you might have to do this: the thread broke, you ran out of shuttle thread, you found a mistake and the easiest way to undo it was to cut the core thread and pull it out, or you want to change colors.
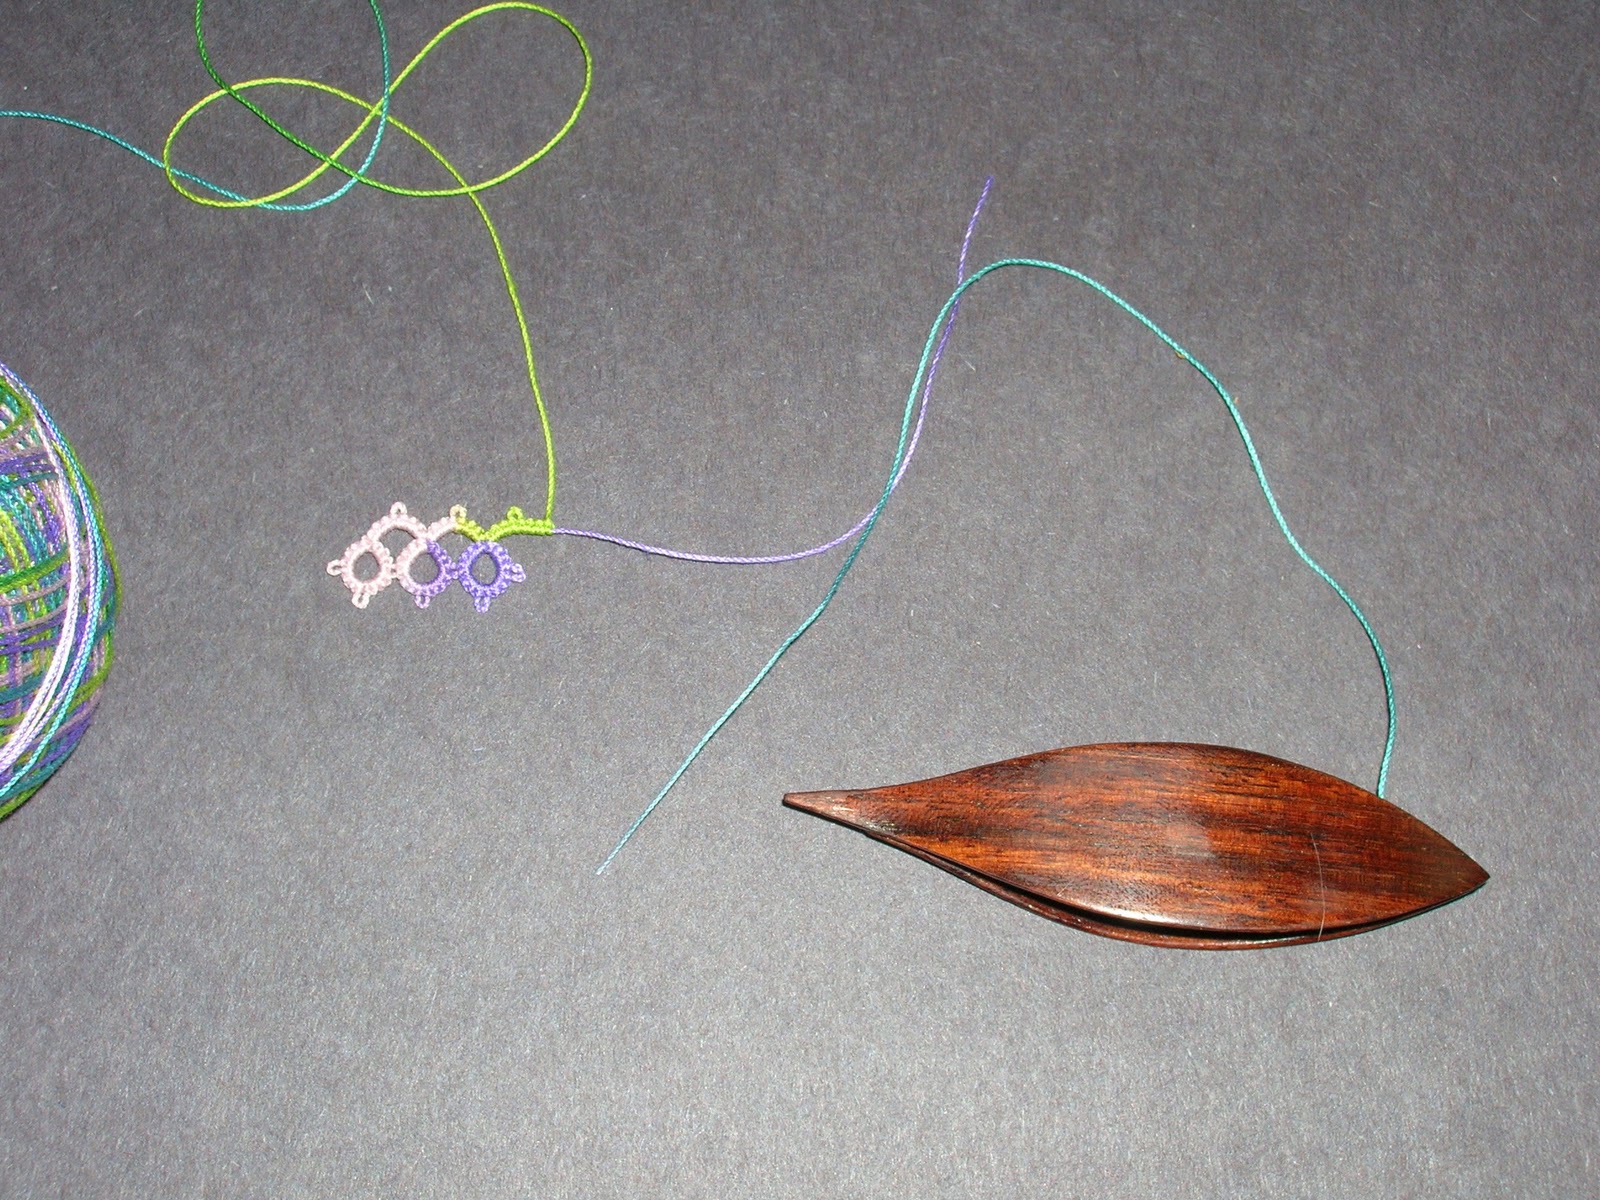
The first picture shows the cut shuttle thread. If at all possible, I like to join on my new thread before making a ring. Then I can tat one tail into the ring, and the other into the following chain. I think that tatting over two tails at once looks too bulky.


 You can see the slight enlargement of the ring where I have tatted over the tail. In a larger piece of tatting, this would blend in; people don't really notice this kind of thing unless they are looking for it (and I say this as a raging perfectionist myself). In reality, if I were making a piece this small and the thread broke, I would simply start over. The technique is really for when you're too far along to do that.
Not everyone does it the same. Some tatters prefer to simply lay the new thread parallel to the old and skip the knot because they don't like they way it looks. I can definitely understand this argument; however, I am paranoid, and without the knot I would be afraid that the tatting would pull apart in this spot if it got tugged on too hard. In fact, I've seen this happen.
One final perfectionist note. When using a variegated thread, I would normally try to align the color of the new thread to the old as closely as possible. I didn't do that here so that you could see where all the threads were.
Now for the fun! Since I'm celebrating two milestones, I decided to have two giveaways. I think most tatters will like them both.
Giveaway A:

 This includes a set of five high-quality blank cards to add tatting (or other creative work) to; a skein of LadyShuttleMaker's "Pear Glace" HDT in size 50; a skein of Yarnplayer's "Leafy" HDT in size 40; a gift certificate to Handy Hands; and a 2 1/2 inch David Reed Smith shuttle in East Indian rosewood.
Here's how it works:
1. To enter, leave a comment on this post by Thursday October 28.
2. A single comment qualifies you for both giveways, so only one entry per person.
3. The same person will not be allowed to win both giveaways.
4. Your comment must include a way for me to contact you. If your Google profile includes your e-mail address, or you have a blog that I can leave a comment on, that's fine. If not, you need to give me your e-mail address; you can disguise it from spammers in the form of "yourname at emailprovider dot com".
5. At 5:00 pm Mountain Daylight Time, Thursday October 28, I will use a random number generator to select the winners. I will then e-mail the two winners to get their mailing addresses, and announce their names.
All clear?
But, one of the rules I made for myself is I'm not allowed to post a bunch of fluff just for the sake of getting to 100. There has to be a reason for the post. I thought I'd do a tutorial on joining on a new shuttle thread, because I know this is something new tatters have trouble with. There are several reasons why you might have to do this: the thread broke, you ran out of shuttle thread, you found a mistake and the easiest way to undo it was to cut the core thread and pull it out, or you want to change colors.
The first picture shows the cut shuttle thread. If at all possible, I like to join on my new thread before making a ring. Then I can tat one tail into the ring, and the other into the following chain. I think that tatting over two tails at once looks too bulky.
Tie a slipknot in the new shuttle thread, making sure that the thread leading to the shuttle is the end that will slip. This picture shows the knot loosely formed so that you can follow the thread.

Tighten the knot by pulling on the short end, but don't make it too tight.

Pass the old shuttle thread through the loop.

Slide the slipknot up the tail of old thread so that it is flush with the tatting. Tighten the loop by pulling on the shuttle.

Continue pulling on the shuttle until you feel a little "pop". When you feel this, you will have pulled the loop of the slipknot all the way through, and the old thread will now form a knot around the new one. This is a similar concept to flipping the stitch when you tat. You may need to practice this part a few times until you're comfortable with it. Click this photo if you need a larger view of what it should look like.

The knot is now secure and you can resume tatting. The threads will usually align themselves nicely so that one of them will "want" to go with the ring and the other will "want" to go with the chain. Here you see one tail being tatted into the ring.

And the other tail being tatted into the next chain. If you are unfamiliar with tatting over tails, please see Gina's excellent video demonstration.

Here is the completed chain.

And I have created a fabulously beautiful edging.

Not everyone does it the same. Some tatters prefer to simply lay the new thread parallel to the old and skip the knot because they don't like they way it looks. I can definitely understand this argument; however, I am paranoid, and without the knot I would be afraid that the tatting would pull apart in this spot if it got tugged on too hard. In fact, I've seen this happen.
One final perfectionist note. When using a variegated thread, I would normally try to align the color of the new thread to the old as closely as possible. I didn't do that here so that you could see where all the threads were.
Now for the fun! Since I'm celebrating two milestones, I decided to have two giveaways. I think most tatters will like them both.
Giveaway A:

This includes three snowflakes of my own design (for details on the snowflakes, see this post); a 10-yard sample of each of the hand-dyed threads used to make said snowflakes; Lacis crochet hooks in 0.4 mm and 0.5 mm; a Clover crochet hook in size 8 (not pictured due to a backorder issue, but it will definitely be here by the time the giveaway closes; Barbara Foster tells me that, although there is no industry standard for crochet hook numbers, Clover's size 8 is about 0.9 mm); Delica seed beads in three neutral colors that will look nice with any thread; and a pair of Gingher embroidery scissors.
Giveaway B:

Here's how it works:
1. To enter, leave a comment on this post by Thursday October 28.
2. A single comment qualifies you for both giveways, so only one entry per person.
3. The same person will not be allowed to win both giveaways.
4. Your comment must include a way for me to contact you. If your Google profile includes your e-mail address, or you have a blog that I can leave a comment on, that's fine. If not, you need to give me your e-mail address; you can disguise it from spammers in the form of "yourname at emailprovider dot com".
5. At 5:00 pm Mountain Daylight Time, Thursday October 28, I will use a random number generator to select the winners. I will then e-mail the two winners to get their mailing addresses, and announce their names.
All clear?
Thursday, October 21, 2010
A Little Break
I've been taking a bit of a break from tatting this week, so I don't have anything new to show, sorry. I'll show you an older piece, though. This is "Lucky Clover" from Tatting Patterns and Designs by Gun Blomqvist and Elwy Persson.
 I've been thinking about this one lately because Diane is currently tatting it in blue. I used DMC 80; I don't remember the color numbers, but I remember being pretty excited to find that the dark shade on the variegated thread matches the solid thread exactly. I was going through a phase at the time where I wanted everything to be variegated, so I'm really glad that I chose to use the solid for most of this piece. Having the whole thing variegated would be overwhelming, although I do think it makes a nice accent on the outer round.
Being a fairly new tatter at the time, I was also not really confident about securing my ends, so I used to use Fray Check. If you click to enlarge this, you'll see why you're not supposed to do that. Fortunately, it only shows if you look very closely, and I've learned my lesson.
In other news, I've been invited to play at Weems Artfest, which is a pretty big deal around here. I really consider myself primarily a professional harpist just working another job to pay the bills. The reason I need that other job is because I'm completely useless at self-promotion and therefore hardly ever get gigs. I really have to thank my friend and fellow harpist Kathy Wimmer, whose recommendations have gotten me several gigs, including this one.
Next post will be number 100!
Sunday, October 17, 2010
Krystle's Fairies
Krystle's new threads are so pretty, I wanted to use them right away. I needed to choose a pattern that would be enhanced by the subtle shading of a hand-dyed solid. I went with my "Angels in the Snow".

This is done in "Wine Berry". Just look at those patches of more and less intense color.

Saturday, October 16, 2010
The Postman Cometh
Or possibly the postwoman. They use my route to train new mail carriers, so I never know who's going to deliver the mail, or when. But it doesn't really matter, as long as they keep bringing me goodies. Today I received two tatting-related packages.
The first is my latest order from Yarnplayer:
 Her latest colorway, "Purple Glory", in sizes 30, 50, and 80. Purple is my favorite color, and morning glories are one of my favorite flowers, so you know I had to have this one.
Squijum is recovering nicely from yesterday's traumatic experience. He's playing almost like nothing ever happened, although I notice he's not jumping quite as much as normal. That's OK, he will soon. Meanwhile, he's got pain medication, and it's actually not too hard to give him.
Tomorrow I'll show some tatting. I realize I haven't done that in a while, and this is supposed to be a tatting blog.
Oh, did I say two tatting-related packages? Sorry, I can't show the other one just yet-- it's a surprise! Don't worry, you'll get to see it three posts from now.
The first is my latest order from Yarnplayer:

Squijum is recovering nicely from yesterday's traumatic experience. He's playing almost like nothing ever happened, although I notice he's not jumping quite as much as normal. That's OK, he will soon. Meanwhile, he's got pain medication, and it's actually not too hard to give him.
Tomorrow I'll show some tatting. I realize I haven't done that in a while, and this is supposed to be a tatting blog.
Oh, did I say two tatting-related packages? Sorry, I can't show the other one just yet-- it's a surprise! Don't worry, you'll get to see it three posts from now.
Friday, October 15, 2010
New HDT's and How to Keep Them
I got Krystle's latest colorway, "Of Berries and Fairies".


There are two skeins of size 80, and size 40 in the variegated plus two matching solids. The second one on the left is really a pale lavender, not white, but my camera just doesn't do that color. I love the way Krystle's "solids" are really subtly shaded with different intensities of color. Krystle, I really love the sky blue in this colorway, too (hint, hint).
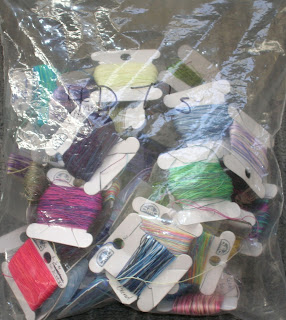
Up till now, I've stored my HDT's like this:

At Jo-Ann's today, I found a much better way. I'm sure it's old hat to cross-stitchers, but it's new to me.

So now I can store my HDT's like this:

Much easier to see, no? Now I've got them all separated by size and color, with enough room for expansion. Of course I've still got another whole bag of HDT's that are still in skeins...
Squijum is at the vet today getting neutered and microchipped. Maybe tonight I'll take advantage of him being drugged to wind a few more skeins onto floss bobbins.
By the by, this is my 96th post. My original purpose in going to Jo-Ann's today was to pick up a little something for my 100th post celebration. Stay tuned...
Wednesday, October 13, 2010
Needlecraft Magazine 1916-1921, Part VI
I decided to add this separate post on the non-tatting-related advertisements from Needlecraft that I found interesting/ amusing.


As a musician, these first two caught my attention.

Certainly there are many fine self-taught musicians. But to call it a "complete conservatory course" when your teacher will never hear you play to be able to give you feedback seems a bit over the top. That ad seems downright sober and sensible, though, compared to this one:

An hour? Really? They must have been counting on the fact that most disappointed customers would find it too much trouble to mail the book back.
Here's another skill that today we would never dream you could learn by correspondence.
Of course nurses didn't have the same responsibilities as they do now, and licensing requirements were not as stringent. However, I don't understand how anyone could think you could learn to be a nurse without your instructor ever seeing you at the bedside.
I'm also once again astonished by how much money has changed in almost a century. Back then $18-30 a week was a really good salary, especially for a woman. Today that's about what nurses make per hour.
Sometimes the line between articles and advertising was a bit fuzzy.

At first glance, I thought this was a legitimate article. Then I saw the more obvious ad on the other half of the page; then I actually read (well, skimmed) the "article" and realized that far from being about making biscuits, it's really just a list of ways you could use National Biscut Company products as a housewife and hostess.
Some companies still do this ad-posing-as-article trick today, and some media outlets still accept it because it's cheaper than writing their own copy. One hopes that today's readers and viewers are media-literate enough to recognize the tactic, but sadly, many aren't.
Finally, one example of how times have changed for the better:

In those days nobody saw anything wrong with this; the magazine's largely white audience would actually have found it funny. At least we have advanced beyond that.
This concludes my series from Needlecraft. Please leave a comment if you've enjoyed it. And if you have any antique needlework magazines hiding in your closet, dig them out and show them on your blog!
Tuesday, October 12, 2010
Needlecraft Magazine 1916-1921, Part V
Today's issue is the last one I have, January 1921.


A variety of yokes, including one tatted one.

A whole page of tatting patterns. I really like the doily at the top right. Too bad the fabric is an unusual shape that you have to cut and hem yourself; that involves sewing.

A close-up of the border at the bottom of the page. Sorry I couldn't get a clearer picture, but it's a bit smeary in the magazine. This is a very intricate border made of three types of motif, a large one, a small one, and half of the small one. If you can see where the different motifs are, try to imagine how stunning it could look if you did the large and small motifs in different colors. Of course, it's pretty in plain white, too.

Well, this tatting book must be better than the one in yesterday's post because it cost a whole 50 cents. It's always the prices in old magazines that amaze me the most.

Finally, a nice collar.
That's it for items of tatting interest. Tomorrow I'm going to do one more post about non-tatting ads that caught my eye.
Monday, October 11, 2010
Needlecraft Magazine 1916-1921, Part IV
This time around I'm covering April and May of 1920. The first set of photos, from April, are crocheted "Accessories for Your Guest-Chamber". I'm including them because the ground of the articles looks like it could be tatted. I know that there was a fashion at one time to try to imitate tatting in crochet. Of course, the flowers could only be crochet.


Honestly, I find it hard to believe that the average housewife had time to make covers for the talcum-powder box, but what do I know?

Here's an edging and insertion design sent in by a reader.

For a dime, you could get a book of tatting patterns and two balls of thread. Different times.
Now we're on to May.


I rather like this yoke. I could even see myself wearing it, if I had a dress or blouse it would fit on.
Till next time....
A Straggler
Albuquerque International Balloon Fiesta was last week. For some reason I did not see a single balloon all week long. This is highly unusual; most years I see great flocks of them every morning on my way home from work. The fiesta ended yesterday, leaving me highly disappointed to have missed the whole thing.
Then this morning, what to my wondering eyes should appear...
 A few pilots always stick around after the official fiesta, so I finally got to see one.
Then this morning, what to my wondering eyes should appear...

Sunday, October 10, 2010
Needlecraft Magazine 1916-1921, Part III
Yes, it's Part 3. I know if there are two posts in one day, it can be easy to miss the first one. So in case you didn't see it, I did post Part 2 yesterday. Today I'm covering the two issues I have from 1919, February and November.
From the February issue there was only one page that interested me. At the top is a tatted baby bonnet, and at the bottom a vandyke border.


From the February issue there was only one page that interested me. At the top is a tatted baby bonnet, and at the bottom a vandyke border.


If this looks familiar, it is the same border that was in the April 1916 issue. Now the designer has worked out how to turn the corner. It's funny, considering how many issues I'm missing, that I should have the two that both have this border.
On to the November issue.


Sometimes you could mail-order the materials to make the items shown, as with this hen-and-chicks hanky. If I understand it correctly, you could buy the embroidery pattern to stamp or transfer onto your own fabric, or you could buy the hanky with the pattern already on it. For 57 cents, you could get the hanky, embroidery floss, and tatting thread.
Interestingly, it does not say that the tatting instructions come with it, nor are they given anywhere in the magazine. They must have just assumed that everyone knew how to make hen-and-chicks. If you didn't, of course, you could always write to the editor, and she would tell you; I've noticed a lot of the letters to the editor are requests for patterns.

Yoke or collar. This pattern doesn't do so much for me.

This would be the same Anne Orr who also wrote several tatting books and invented the split ring.

And I know you're all planning to serve a Crown of Roast Pork for Thanksgiving, right?
Saturday, October 9, 2010
Hey, I Won!
Wow! I won LadyShuttleMaker's Mondo Monday Giveaway! I'll be getting two issues of The Workbasket, plus a skein of Sherry's gorgeous silk HDT in "Fuschia". I've already worked with this colorway in cotton, so I know it's pretty-- can't wait to see it in silk.
Thanks, Sherry!
Thanks, Sherry!
Needlecraft Magazine 1916-1921, Part II
Do you like my new look? I saw the lace and had to have this background. How are the colors? Easy to read?
My hit counter passed 5000 yesterday. My 100th post is also right around the corner. We all know how tatting bloggers celebrate such milestones, so watch this space!
Now, on to Needlecraft. Today I will look at the December 1918 issue.


My hit counter passed 5000 yesterday. My 100th post is also right around the corner. We all know how tatting bloggers celebrate such milestones, so watch this space!
Now, on to Needlecraft. Today I will look at the December 1918 issue.

This is the bottom of a crocheted candleshade. I think it is intended to resemble tatting.


A doily sent in by a reader. Notice that the outer round is hen-and-chicks. It's a perennial favorite.
This issue-- remember, December 1918-- contains a lot of material on the War Effort and supporting the soldiers. It's interesting that the issues from 1916 and 1917 don't have this, though it may be that the two issues I have are not representative of those years. More interesting is the timing of the content of this issue. The magazine must have gone to press long before the actual issue date. Not that there wouldn't still have been soldiers in Europe in December (it was still another six months till the Treaty of Versailles), but theoretically they shouldn't have been getting shot at so much. Anyway, I'm pretty sure this magazine would have been celebrating the armistice if they had known about it at press time.


Another cultural note is that back then, articles about Christmas appeared in the December issue, not the July issue.
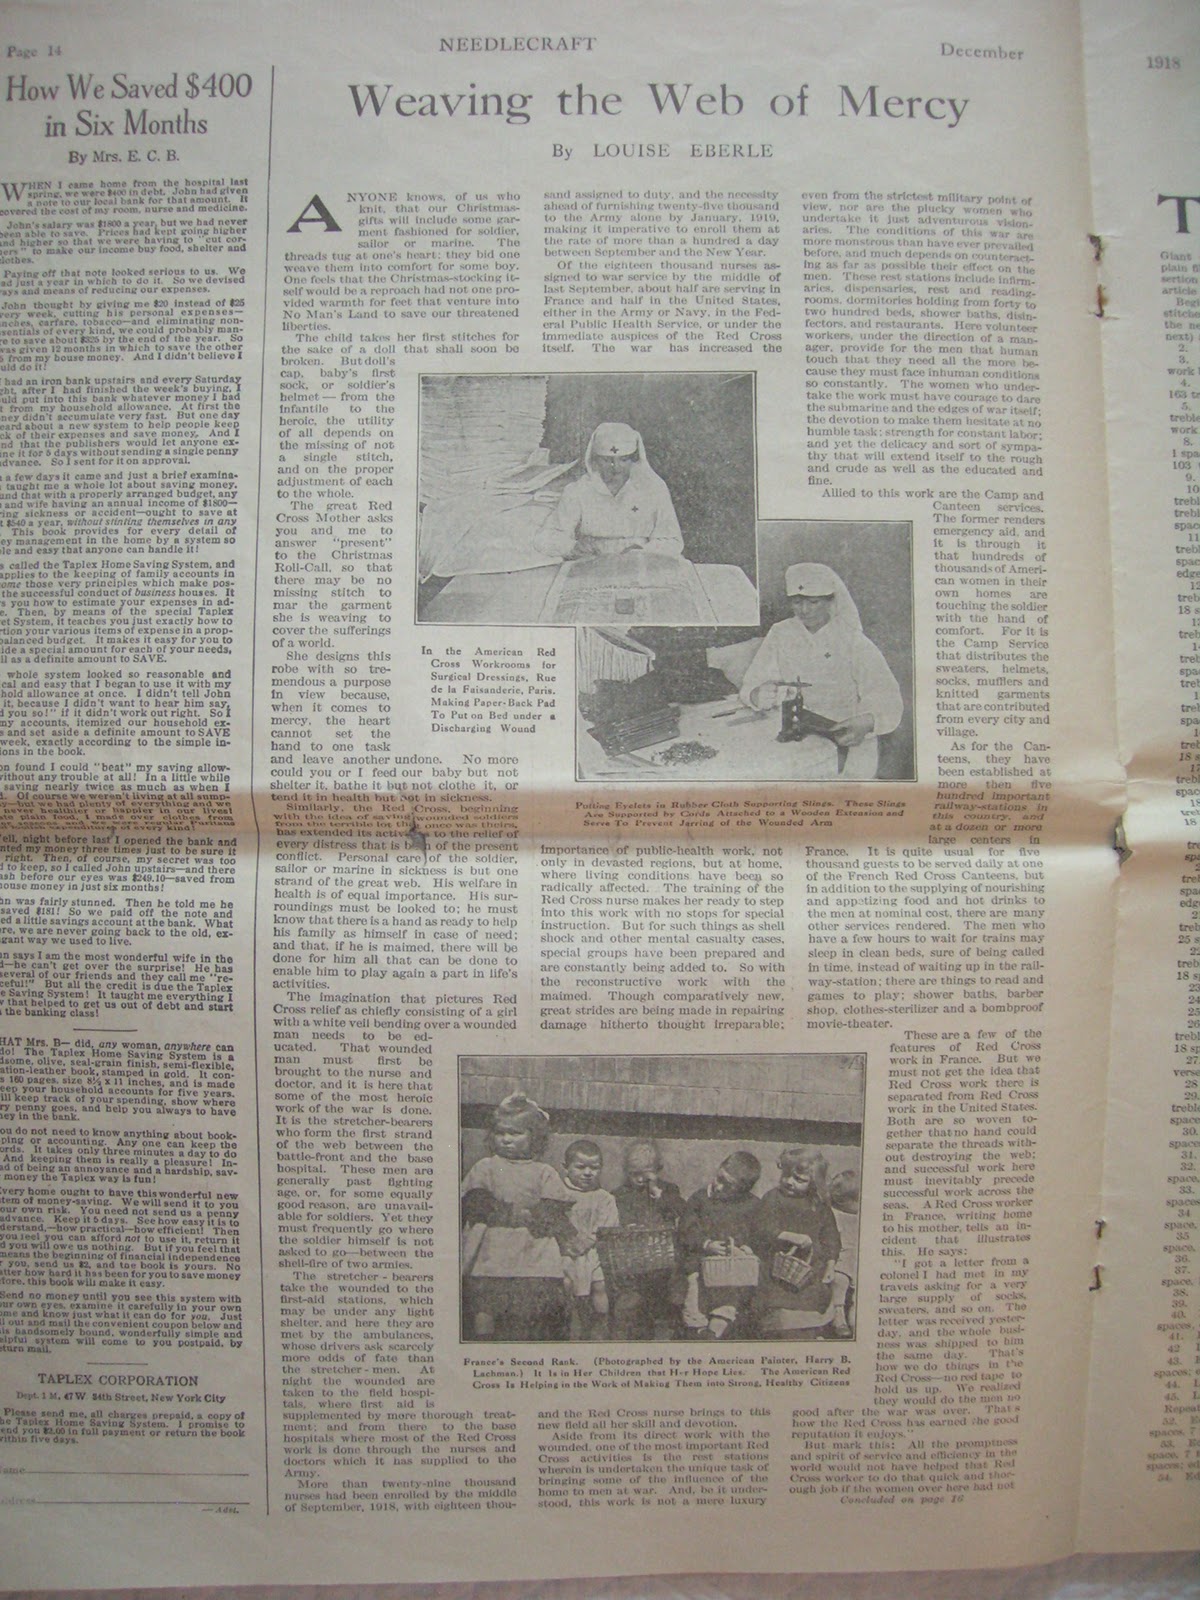
This article describes the work of the Red Cross and exhorts readers to knit items of clothing for the soldiers.
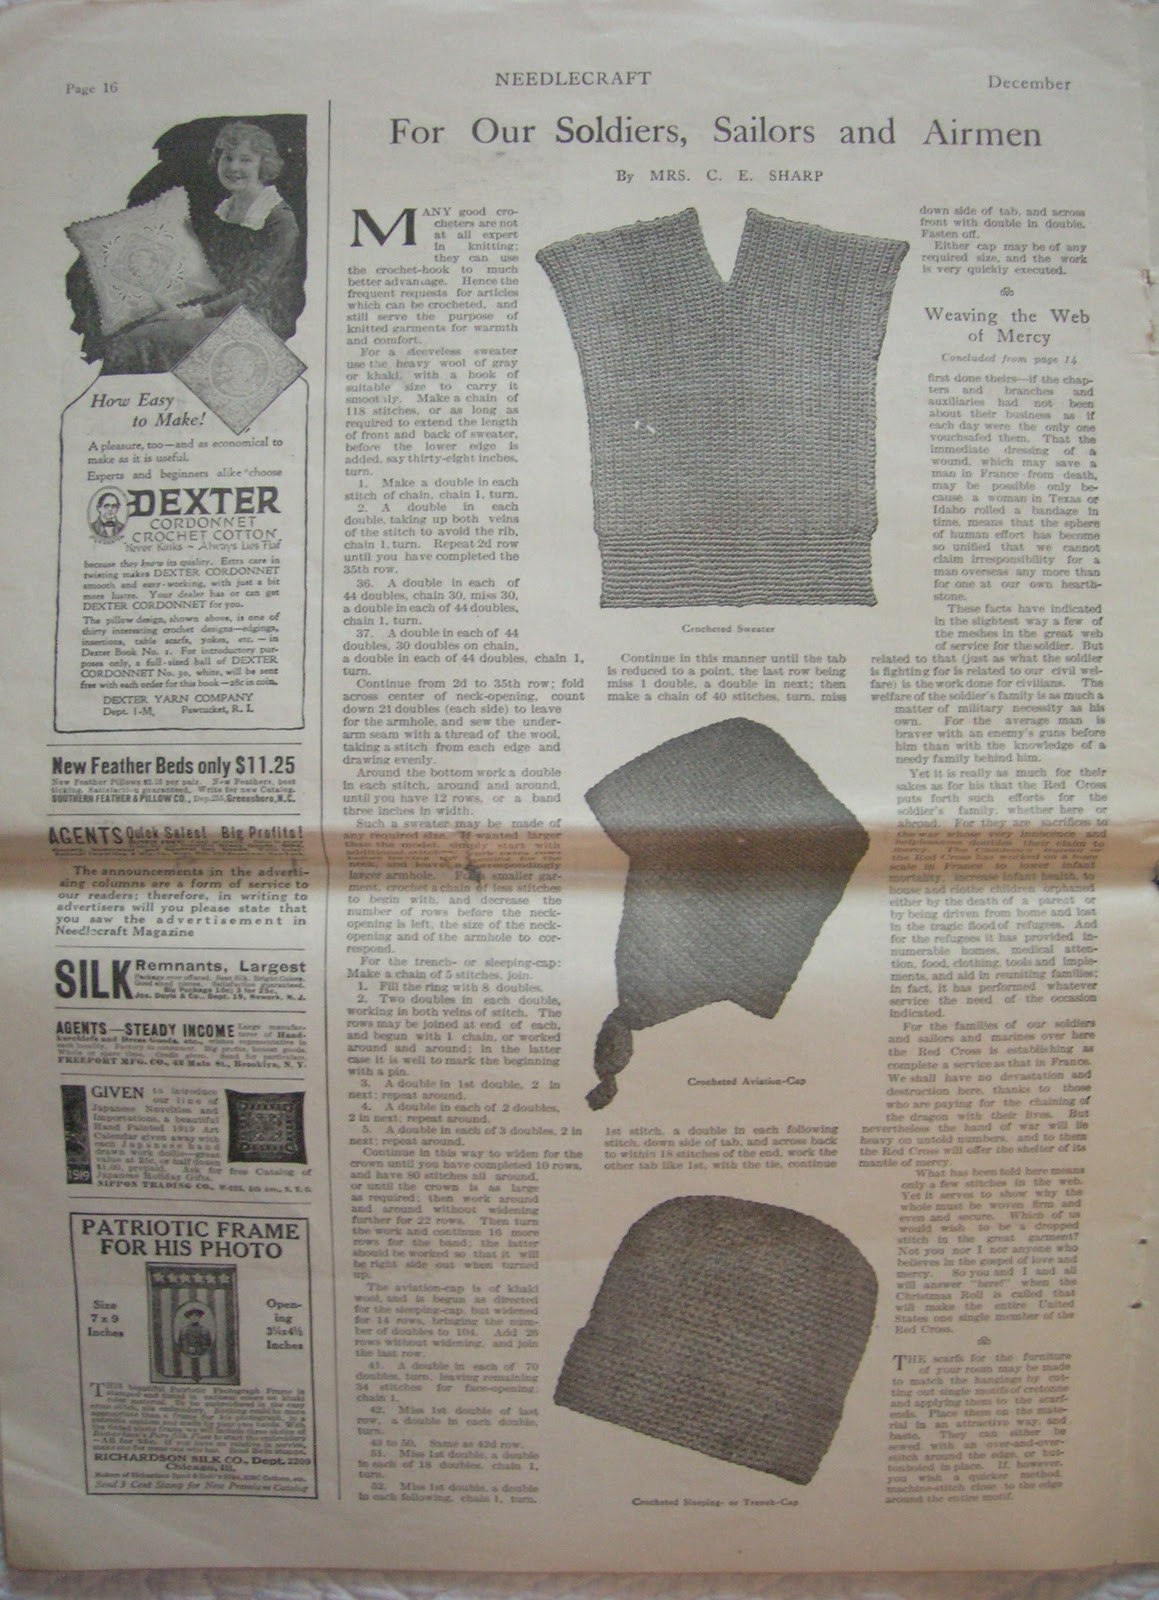
Patterns to crochet for soldiers. At the bottom left is also an ad for a patriotic picture frame for the photo of your soldier family member.

Even purely decorative patterns were inspired by patriotism and pride in the service members, as seen in this filet crochet pattern.
The next batch of pictures will have more tatting-related content. But part of the interest of old magazines is in looking at the historical context and how it affected people's daily lives, so I wanted to get this in.
Subscribe to:
Posts (Atom)